Tips for Interfacing HomeVision with Home Assistant
- Overview
- Basics of the HomeVisionXL MQTT plug-in
- MQTT Auto Discovery
- Tips
- Variable Options
- Running Macros, Setting Flags and Variables and Executing Other Actions
- Simple Control of Discovered Objects
- Using a Toggle Macro and a Tracking Flag
- Using Different Macros for ON and OFF via a Virtual External Device
- Using Different Macros for ON and OFF and a Tracking Flag via a Virtual External Device
- Using Different Macros for ON and OFF and a Tracking Flag without a Virtual External Device
- Using Triggers for Different On/Off Complex Actions with a Virtual External Device
- Using a Single Trigger for Complex Actions with a Virtual External Device
- Running Scheduled and Periodic Events
- Running Other Objects
- Timers
- Generic Homevision Actions
- Refreshing HomeVision Objects
- Retain Option for Objects
Overview
This help discusses ways to connect Home Assistant to your HomeVision controller running HomeVisionXL. Emphasis is on using MQTT as the connecting method and assumes you have an MQTT broker running in your system. With the versatility of the MQTT plug-in with respect to how many different ways you can use it to control your devices along with the complexity and power of Home Assistant, the possible combinations are almost endless. This document tries to give a few of the more obvious solutions to common situations.
Basics of the HomeVisionXL MQTT plug-in
First let’s go over the basics. The MQTT plug-in provides support for monitoring and controlling of both HomeVision “internal” objects like x10, lights, vars, flags, etc. via MQTT, and “External” devices such as ESP8266 based products running Tasmota software. This Help doesn’t go into all the details of the MQTT plug-in. See MQTT Help for that.
How the MQTT plug-in Handles Internal Objects
The MQTT plug-in exposes internal objects to the MQTT system by publishing STATE topics to report an object’s state and by subscribing to COMMAND topics that can control the internal object. Only internal objects included in the MQTT plug-in’s Int Objects configuration screen are exposed.
When an exposed internal object changes state, it produces one or two MQTT messages, depending on options chosen in “Settings”. For example:
stat/topic/POWER ON
and/or
stat/topic/RESULT {"POWER":"ON","Dimming":"100}
An internal object can be controlled by sending an MQTT message like this:
cmnd/topic/POWER ON 50
How the MQTT plug-in Handles External Devices
The MQTT plug-in can track the state of and control external devices by subscribing to STATE topics and publishing command messages. Only external devices included in the MQTT plug-in’s “Ext Devices” configuration screen are monitored.
When an external device changes state, it typically produces one or two MQTT messages, depending on device settings:
stat/topic/POWER ON
or
stat/topic/RESULT {"POWER":"ON","Dimming":"100}
The MQTT plug-in can respond to these STATE messages in a number of ways, such as changing flags or variables, running macros, executing procedures, or any combination of these.
An external device can be controlled by sending an MQTT message like this:
cmnd/topic/POWER ON 50
It’s important to keep in mind that the above are examples, and there is significant variation in how all this is done, which can be taken advantage of when interfacing with Home Assistant. For Home Assistant, this means that “virtual” external devices can be created and used to cause actions in HomeVision.
Virtual External Devices
A “virtual” external device is a external device configuration entry in the MQTT Plug-in’s Ext Devices tab that has no corresponding physical device. But, since it will have a topic, it can be accessed by any MQTT entity, and in turn it can run the Flag, Variable or Commands set up in that “virtual” external device’s configuration entry.
In the Tips section to follow, there are several examples where this capability is used.
MQTT Auto Discovery
For systems where you want to expose a significant number of internal objects to Home Assistant, the MQTT plug-in provides an Auto Discovery feature that pushes discovery messages to Home Assistant, negating the need to enter each object’s code into your configuration.yaml.
Valid object types are x10, light, var, var_n, flag, flag_b, input, output, analog, temp, ir, macro, se, pe, timer and hvac.
Other plug-ins that support objects that can be discovered can add object types.
You can find out more about how to run Discovery here:
How to Use the MQTT Plug-in’s Home Assistant Auto Discovery
Tips
Variable Options
Variables are supported as either sensor (var) or number (var_n) entities, or both.
Straightforward, bi-directional control of variables from the Home Assistant UI is supported via the MQTT Discovery number entity (use var_n).
They can be included in discovery as read-only sensors (use var). (The MQTT Plug-in itself allows both reading and writing of variables.)
Variable Example
Note: variables as number entities, which appear in the Home Assistant UI as sliders, is a recent addition to discovery. The following example, devised before number entities were available to MQTT discovery, is a technique to essentially provide the same functionality with a variable sensor. As such, it is kept here for reference as some of the techniques included may be useful.
For applications other than sensors, it is possible to include HomeVision variables as part of automations, so application-specific configurations could be done.
For a simple application of a variable,
create a slider that takes its value from a State message from HomeVisionXL and transmits back a new value if the slider is manually changed.
This can be done by creating an “input number” entity (to create the slider) along with two automations.
For each variable you want to expose in Home Assistant:
- First create the input_number entity for the variable you want to set/read.
- Create an automation to get the value of the HomeVision variable.
- Create an automation to set the value of the HomeVision variable.
You do not need to create both automations if you only want to either just read or just set the variable.
The easiest way to create the input_number entity in Home Assistant is Configuration->Helpers->Add Helper->Number.
There are blueprints for the two automations. You can get them into Home Assistant by Configuration->Blueprints->Import Blueprints and use the following URIs:
https://github.com/rebel7580/Home-Assistant/blob/master/get_variable.yaml
https://github.com/rebel7580/Home-Assistant/blob/master/set_variable.yaml
If you wish to enter directly in YAML, here is an example.
You will need to replicate these three sets of code for each variable you want to support, making sure you change the Variable names and topics.
# Example configuration.yaml using 'input_number' in an automation
input_number:
  var_145:
    name: Var 145 Slider
    min: 1
    max: 255
    step: 1
    unit_of_measurement: step
The automations should be in automation.yaml or after the automation: !include automations.yaml line in configuration.yaml.
# This automation script runs when a value is received via MQTT
# It sets the value slider on the GUI.
automation myvars:
  - alias: Set var 145
    trigger:
      platform: mqtt
      topic: 'stat/Var145/RESULT'
    action:
      service: input_number.set_value
      data:
        entity_id: input_number.var_145
        value: "{{ trigger.payload_json.STATE }}"

# This second automation script runs when the slider is moved.
# It publishes its value to the same MQTT topic as myvars.
  - alias: slider moved
    trigger:
      platform: state
      entity_id: input_number.var_145
    action:
      service: mqtt.publish
      data:
        topic: 'cmnd/Var145/POWER'
        payload: "{{ states('input_number.var_145') | int }}"
Running Macros, Setting Flags and Variables and Executing Other Actions
There are at least three “categories” into which interactions with HomeVision and Home Assistant can be grouped.
- Direct control of a Discovered object via its HomeAssistant entity.
- Control using multiple objects via created entities in yaml.
- Control using a "virtual" external device as an intermediary for complex actions.
Most of the following Tips can be used with almost all of the Internal Objects, not just the ones shown in the examples.
Simple Control of Discovered Objects
Discovered Objects like X-10 lights, flags, outputs, macros, IR, etc. appear in Home Assistant as appropriate entities, which in most instances can be integrated directly into your Home Assistant GUI and used without very much additional work. Here’s a screenshot of a simple “entities card” with a selection of discovered light and switch entities, with some tweaks to the icons used.

Using a Toggle Macro and a Tracking Flag
Home Assistant automatically configures macros as switch entities (as in the previous section).
This is the easiest way to run a macro.
But what if you want a button that runs a macro, and also show the result of that action?
You can’t do it directly via the macro, since it doesn’t report a useful state (as macros have none).
You need another entity for that.
For example, you have a macro (“Toggle Garage Door 1”) that toggles your garage door, and an input (“Door1”) that indicates the state (Open/Closed) of the door.
You’d like the state/icon of the button to show the door’s state.
There are (at least) two ways to do this. The first is probably the best way, as it does not require manual modification of the configuration.yaml file. The second is the “original” method in these Tips. Both start with this step:
- Add the "Door1" input and "Toggle Garage Door 1" macro to the Int Objects list. Run MQTT discovery for at least the "Door1" input binary sensor, but it won't hurt if you do for both, so you can use them in Home Assistant for other reasons, as well as in this case.
Method 1:
- Create a button in the HA GUI. Use the GUI editor, but here is the corresponding yaml:
type: button
tap_action:
  action: call-service
  service: mqtt.publish
  service_data:
    topic: cmnd/ToggleGarageDoor1/POWER
    payload: Run
  target: {}
entity: binary_sensor.ib_5_door1
icon: mdi:garage
icon_height: 50px
name: Garage Door 1
Done!
If you want “dynamic” icons, leave “icon:” blank, and define a device class for the binary sensor.
In this example, you would use a device class of “garage_door”.
See Device Class Note at the end of How to Use Home Assistant Auto Discovery
Method 2:
- Manually add the following to your configuration.yaml (HA Core 2022.6 and later):
mqtt:
  switch:
    - name: "MA_GarageDoor1"
      unique_id: "MA_GarageDoor1"
      state_topic: "stat/Door1/POWER"
      command_topic: "cmnd/ToggleGarageDoor1/POWER"
      payload_on: "ON"
      payload_off: "ON"
      state_on: "Open"
      state_off: "Closed"
      qos: 1
Version deprecated in HA Core 2022.6 (usable until removed in 2022.9):
- switch:
  - platform: mqtt
    unique_id: "MA_GarageDoor1"
    name: "MA_GarageDoor1"
    state_topic: "stat/Door1/POWER"
    command_topic: "cmnd/ToggleGarageDoor1/POWER"
    payload_on: "ON"
    payload_off: "ON"
    state_on: "Open"
    state_off: "Closed"
    qos: 1
- Create a button in the HA GUI. Use the GUI editor, but here is the corresponding yaml:
    type: button
    entity: switch.ma_garagedoor1
    icon: 'mdi:garage'
    name: Ron's Garage Door
When the button is pressed, the macro will run to toggle the door, and the input will report back the door’s position, which will be reflected in the button’s state and/or icon. Since the button’s state is controlled by the Door1 state, it can be “On” and “Off”. If “On”, the button when press will send the “off” payload, so both command payloads are set to “ON” since that’s what the macro expects.
Same comment as in Method 1 applies for “dynamic” icons.
Using Different Macros for ON and OFF via a Virtual External Device
While macros can be run directly by configuring them in the Int Objects screen and running MQTT Discovery,
there may be situations where more flexibility is needed.
For example,
you want to run different macros when sending an “on” or “off” from the same topic.
The handling of external devices has significant capabilities for executing actions within HomeVisionXL. When a MQTT State message is received by the MQTT plug-in, a number of actions can be done.
We can use these capabilities to enable Home Assistant to do these actions. The way to do this is to create a “virtual” external device, i.e., one defined in the “Ext Devices” MQTT configuration screen, but does not actually physically exist. Instead, we will program Home Assistant to be that “device”.
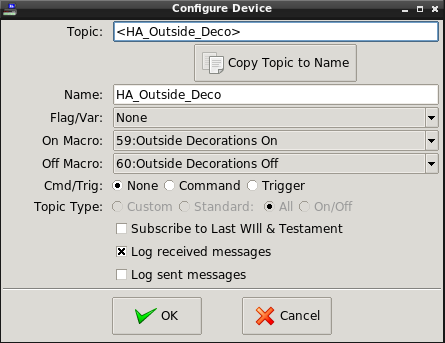
First, in the MQTT Configuration Ext Devices Tab, set up a virtual external device with an appropriate descriptive topic and the ON and Off macros you want to run defined in the On and Off macro fields.
Next set up a switch in Home Assistant’s configuration.yaml Since this is an external device, you can’t use MQTT discovery.
(HA Core 2022.6 and later):
mqtt:
  switch:
    - name: "HA_Outside_Deco"
      unique_id: "HA_Outside_Deco"
      state_topic: "stat/HA_Outside_Deco/POWER"
      command_topic: "stat/HA_Outside_Deco/POWER"
      payload_on: "ON 1"
      payload_off: "OFF"
      state_on: "ON 1"
      state_off: "OFF"
      qos: 1
Version deprecated in HA Core 2022.6 (usable until removed in 2022.9):
- switch:
  - platform: mqtt
    unique_id: "HA_Outside_Deco"
    name: "HA_Outside_Deco"
    state_topic: "stat/HA_Outside_Deco/POWER"
    command_topic: "stat/HA_Outside_Deco/POWER"
    payload_on: "ON 1"
    payload_off: "OFF"
    state_on: "ON 1"
    state_off: "OFF"
    qos: 1
Note that command_topic and the state_topic are the same. Since HomeVisionXL responds to state messages to execute actions, Home Assistant must send a “stat” message to the MQTT plug-in. Home Assistant also will listen to the state_topic, so will hear its own message and ensure that the switch is in the correct state.
Lastly, add in a switch to your UI.
Using Different Macros for ON and OFF and a Tracking Flag via a Virtual External Device
There are potentially two shortcomings of the previous solution: It requires a “virtual” external device, and, more importantly, there is no way keep the “state” of the switch in sync with what is happening. If, for instance, the switch is used to run a macro to turn something(s) on, but the “off” macro is executed from some other place, the switch won’t change and hence will not display the actual “state”.
We can resolve the second concern by defining the “stat” parameters in the yaml switch to reflect the object used to track “state”. Let’s assume we have a Flag “OutsideDecoState” which tracks whether the outside decorations are on or not. Discover it as a binary sensor.
Use the same “virtual” external devices before, but include the binary sensor in the yaml:
(HA Core 2022.6 and later):
mqtt:
  switch:
    - name: "HA_Outside_Deco"
      unique_id: "HA_Outside_Deco"
      state_topic: "stat/OutsideDecoState/POWER"
      command_topic: "stat/HA_Outside_Deco/POWER"
      payload_on: "ON 1"
      payload_off: "OFF"
      state_on: "Set"
      state_off: "Clear"
      qos: 1
Version deprecated in HA Core 2022.6 (usable until removed in 2022.9):
- switch:
  - platform: mqtt
    unique_id: "HA_Outside_Deco"
    name: "HA_Outside_Deco"
    state_topic: "stat/OutsideDecoState/POWER"
    command_topic: "stat/HA_Outside_Deco/POWER"
    payload_on: "ON 1"
    payload_off: "OFF"
    state_on: "Set"
    state_off: "Clear"
    qos: 1
Using Different Macros for ON and OFF and a Tracking Flag without a Virtual External Device
To simplify further, the “virtual” external device can be eliminated by using a Template Switch. This method uses the binary sensor to set the switch state and provides for having different topics for the “on” and “off” actions.
- switch:
  - platform: template
    switches:
      outsidedeco:
        unique_id: "outsidedecotmplsw"
        value_template: "{{ is_state('binary_sensor.OutsideDecoState', 'on') }}"
        turn_on:
          service: mqtt.publish
          data:
            topic: 'cmnd/OutsideDecorationsOn/POWER'
            payload: 'Run'
        turn_off:
          service: mqtt.publish
          data:
            topic: 'cmnd/OutsideDecorationsOff/POWER'
            payload: 'Run'
You can add additional switches as needed under “switches”.
Using Triggers for Different On/Off Complex Actions with a Virtual External Device
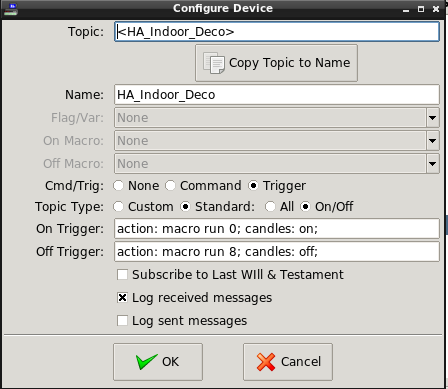
This one shows how to use standard ON/OFF triggers to execute actions more complex than just one macro each for ON and OFF. It uses a serial command to the action plug-in to run the macros, then a serial command to custom plug-in to control a candles object.
Using a Single Trigger for Complex Actions with a Virtual External Device
This one shows using a single trigger (independent of ON/OFF) to send a series of IR commands.
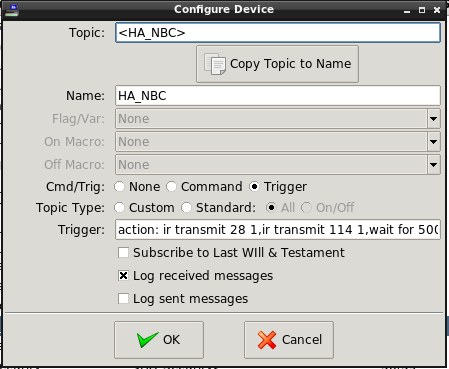
The compete trigger command (obscured in the screen shot) is:
    action: ir transmit 28 1,ir transmit 114 1,wait for 500,
            ir transmit 116 1,wait for 500,ir transmit 110 1;
In this example, IR is used, but with a virtual external device to allow for more complex command execution. Consequently, a switch should be added manually to your configuration.yaml. Here is what the switch code would look like (HA Core 2022.6 and later):
mqtt:
  switch:
    - name: "IR_HA_NBC"
      unique_id: IR_HA_NBC
      state_topic: "stat/HA_NBC/POWER"
      command_topic: "stat/HA_NBC/POWER"
      payload_on: "ON 1"
      payload_off: "Off 1"
      state_on: "ON"
      state_off: "Unknown"
      qos: 1
Version deprecated in HA Core 2022.6 (usable until removed in 2022.9):
switch:
  - platform: mqtt
    unique_id: IR_HA_NBC
    name: "IR_HA_NBC"
    state_topic: "stat/HA_NBC/POWER"
    command_topic: "stat/HA_NBC/POWER"
    payload_on: "ON 1"
    payload_off: "Off 1"
    state_on: "ON"
    state_off: "Unknown"
    qos: 1
Next, create a button using the state_topic and payload_on in MQTT Publish service.
Running Scheduled and Periodic Events
The MQTT plug-in provides for direct execution of Scheduled and Periodic Events, similar to Macros, by defining them in Int Objects configuration.
You also can execute a Scheduled Event or Periodic Event by using the trigger option in a virtual external device.
It may be useful to run these after being triggered by some Home Assistant event, in addition to what HomeVision’s schedule is doing.
They also can be used simply as additional macro space, especially if put in the “Disabled” state, where they normally won’t run via a schedule or period.
To do this, in a virtual external device’s “Configure Device” screen, select “Trigger” and set the “Trigger:” field to something like this:
action: se run 3;
which will run Scheduled Event #3.
Running Other Objects
The previous Tip was called out specifically because it can be used to add in macro capability for those who have run out of macro space. However the idea can be extended to virtually all items in HomeVisionXL. Since the trigger simply sends whatever is there to HomeVisionXL’s serial command processor, you can set triggers for anything the Action plug-in can do (or any other plug-in with its own defined serial commands), and, along with the trigger’s capability to make run-time substitutions in a trigger string, Home Assistant may be able to trigger different things based on the payload sent. In an extreme case, the trigger could be just “%M”, in which case Home Assistant would put in the payload the complete trigger string to execute. See Triggers in MQTT Help for more details.
Timers
HomeVision timers can be controlled via MQTT.
There is no simple “MQTT Discovery” defined in Home Assistant that is appropriate for Timers,
so the MQTT Plug-in’s Discovery sets up two “sensor” entities,
one for the timer’s state (Running, Stopped, Ringing)
and one for the current time (See Note below).
Time is reported in “HHH:MM:SS.hh” format.
The text “state” is appended to the name of the timer for the state entity,
and “time” is appended to the name of the timer for the time entity.
These allow tracking of Timer state and current time, but must be triggered by an MQTT stat message.
A Demonstration on how to implement a Timer GUI is as follows.
- Run MQTT Discovery for the desired timer. This creates two sensor entities. Use these in the GUI to show the Timer state and "current" timer value.
- Create the input_select helper for the timer's control states. (Configuration->Helpers->Add Helper->Select). This is used to specify what timer command to send. Use the following values:
    Options:
        Load
        Start
        Stop
        Clear
- Create the input_text helper for the timer's set time. (Configuration->Helpers->Add Helper->Text). This is used to specify what timer value to send. Use the following values:
    Max: 12
    Min: 10
    Regex pattern: ^(?:(?:([01]?\\d|2[0-3]):)?([0-5]?\\d):)?([0-5]?\\d\\.)?([0-9][0-9]$
Once these are available,
create a GUI using them.
There are probably many different ways to do this, but here is one.
This GUI uses a grid card,
with the two timer entities, the two helpers and two buttons
(to get timer status and send commands to the timer).
Here is the yaml for the above implementation. This was created using the GUI editor, which is a lot easier than writing in yaml, but is shown here to see the details, especially for the Update payload, which needs to be entered in the payload template in the GUI editor as shown in the yaml.
type: grid
cards:
  - type: entity
    name: Wash Timer State
    entity: sensor.wash_timer_state
  - type: entity
    entity: sensor.wash_timer_time
    name: Wash Timer Status
  - type: entity
    entity: input_select.wash_timer_set
  - type: entity
    entity: input_text.wash_timer_time
    name: Wash Timer Time Set
  - type: button
    tap_action:
      action: call-service
      service: mqtt.publish
      service_data:
        topic: cmnd/WashTimer/POWER
        payload_template: |
          {% if is_state("input_select.wash_timer_set", "Load") %}
              load {{ states('input_text.wash_timer_time') }}
          {%-else %}
             {{ states("input_select.wash_timer_set") }}
          {% endif %}
      target: {}
    hold_action:
      action: none
    name: Update Timer
    show_icon: false
  - type: button
    tap_action:
      action: call-service
      service: mqtt.publish
      service_data:
        topic: cmnd/WashTimer/POWER
        payload: '?'
      target: {}
    hold_action:
      action: none
    show_icon: false
    name: Get Timer Status
columns: 2
square: false
Note: The timer’s current time in the GUI does not update automatically, but only when receiving a “stat” update. “stat” updates occur whenever a timer command (load, start,stop,clear or query - i.e., “?”) is sent to the timer.
Generic Homevision Actions
This feature allows you to send a set of commands just like those allowed in an external device trigger. Since this method is not supported in MQTT discovery, It would need to be used in configuration.yaml or in a GUI-based construction, like a button.
Instead of the method used in Using a Single Trigger for Complex Actions with a Virtual External Device, Create a button and use
    Topic:       cmnd/homevision/action
    Payload:     action: ir transmit 28 1,ir transmit 114 1,
                 wait for 500,ir transmit 116 1,wait for 500,
                 ir transmit 110 1;
No “virtual” external device needed.
Generic HomeVision Actions Versus Virtual Devices
Which one is better? It depends on how you want to access the functionality that either method provides.
- If you want to execute complex actions (like in the above example) from more than one place ( e.g., Home Assistant, Node-Red), then it may make more sense to use a virtual device. Otherwise, the generic method would require the same sequence of actions to be duplicated at every source of the command. This could complicate managing any changes that might be needed as you would have to remember to update all occurrences of the action sequence.
- Virtual devices also keep the action sequence information "closer" to the place where it is actually used (in HomeVision), potentially easier to manage.
- If you are only concerned about access from one place (i.e., Home Assistant), using the generic HomeVision action method may simplify implementation in both HomeVision and Home Assistant. No "extra" external device would be required in the MQTT plug-in. The command most likely could be implemented directly in the Home Assistant UI, with little to no manual changes in the configuration.yaml file. A virtual device would usually require a switch entity in the configuration.yaml file.
Refreshing HomeVision Objects
There may be instances (like restarting Home Assistant) where the current status of HomeVision objects is not reflected by Home Assistant. The MQTT plug-in provides a special topic to force all listed objects to report their status:
        Full Topic                        Payload
    cmnd/homevision/object_type/POWER    empty or "?"
or
    cmnd/homevision/POWER                empty or "?"
If you have this issue, you may want to consider adding a button to send this message, or create an automation to issue the command at an appropriate time.
Here’s one possible implementation of an automation that is triggered 1 minute after Home Assistant starts, to make sure that the state of all HomeVision objects gets updated in Home Assistant.
The automation is probably most easily created using the Home Assistant Automation visual editor, but here is the resulting yaml:
alias: Refresh HA for HVXL Objects at Restart
description: 1 Min after HA start, trigger status from HVXL.
trigger:
  - platform: homeassistant
    event: start
condition: []
action:
  - delay:
      hours: 0
      minutes: 1
      seconds: 0
      milliseconds: 0
  - service: mqtt.publish
    data:
      topic: cmnd/homevision/POWER
      payload: '?'
mode: single
Retain Option for Objects
You may also want to consider, as a possible alternative to the previous, whether to enable “retain” for objects that are tracked by Home Assistant.
This should allow Home Assistant to automatically pick up status via the MQTT broker’s retained messages feature.
“Retain” is an option in the MQTT plug-in’s Configure Object screen.
DO NOT confuse the above “retain” with the retain attribute in the Home Assistant discovery payload.
The retain in the Home Assistant discovery payload governs the retain setting of messages sent OUT by HomeAssistant, and is valid only for objects defined as switch, light or climate.